Welcome to Web Audio!
day one / day two / day threeIntros
Share a favorite / memorable audio experience from the past 1-2 weeks
Contact
mattbriannelson@gmail.com
mattholamieux#9634 on discord
https://github.com/mattholamieux
What you will need
- Tone.js Library
- P5.js Library
- Tone.js Docs
- P5.js Docs
- The Slides
- A Code Editor
Pre-Configured Web IDE
with p5.js and Tone.js
Some examples of things built with Tone.js
https://tonejs.github.io/demosWeb Audio: Day One
Synthesis, Sampling, & Effects
Learning Objectives
- Set up our coding environment for web
- Describe the basic building blocks of a synthesizer
- Compare synthesis and sampling
- Apply effects to our sounds
Coding Concepts
- Variables
- Objects
- Functions & Methods
Hello Tone
					// Create a new Tone.Synth object and conect the synth to computer's audio output
					const synth = new Tone.Synth().toDestination();
					// Trigger note C4
					synth.triggerAttack("C4");


Let's use P5 to add buttons.
- We'll use one button to call Tone.start() and trigger the note onset
- We'll use a second button to trigger the note release
We create two global variables on lines 1-2 for our buttons
We create the buttons on lines 8-9 using P5's createButton() function
On lines 10-11, we add the .mousePressed() method to each button, and pass each one a different function
The functions are defined on lines 17-27


Oscillator Types
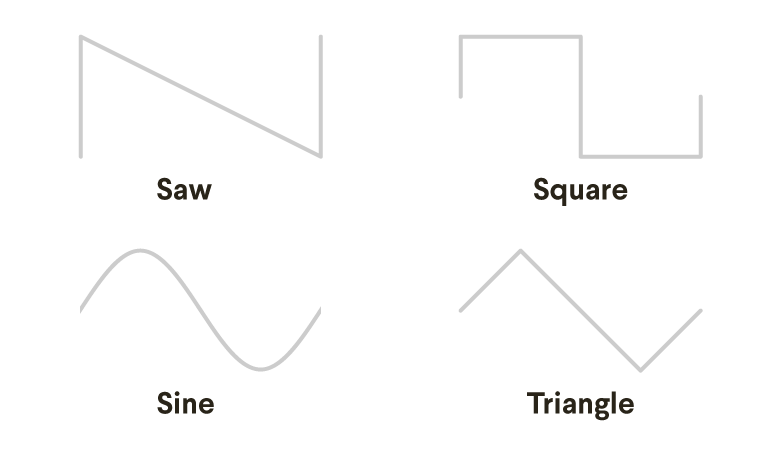
Try changing the oscillator type on line 6
Oscillator Types
What do you notice about the different sonic qualities (or timbre) of the oscillators?
Filters

Creating a Tone.Filter
                    // Create a filter and set cutoff frequency and filter type
                    const filter = new Tone.Filter(500, "lowpass ")
                    // Connect our synth to the filter
                    synth.chain(filter);
                    // Connect the filter to the output
                    filter.toDestination();
Try changing the filter frequency on line 7 from 500 to 2500 to 5000 to 15000 (frequency is the first argument to Tone.Filter)
Then try changing the filter type on line 7 to "highpass "
Bonus: add a line of code to the draw loop to control the frequency value with the mouseX position
Amplitude Envelope

Controlling amplitude in Tone.js
                        // Set attack, decay, and release values for synth
                        synth.envelope.attack = 0.01;
                        synth.envelope.decay = 0.2;
                        synth.envelope.release = 1;
                        // Trigger the note attack followed by the note release after 0.1 seconds
                        synth.triggerAttackRelease("C4 ", 0.1);
Try changing the attack, decay, and release times on lines 10-12
Then try changing the sustain time on line 33 (second argument to triggerAttackRelease)
Bonus: add a conditional statement to the draw loop to control release time with right and left arrows
Defining multiple synth params
                        const synth = new Tone.Synth({
                            oscillator: {
                              type: "sawtooth "
                            },
                            envelope: {
                              attack: 1,
                              decay: 0.5,
                              release: 4
                            }
                          });
We define our synth object in a separate file to keep things tidy
Tone.js includes different synthesis models
Each has different parameters
MonoSynth
                        const monoSynth = new Tone.MonoSynth({
                            oscillator: {
                              type: "square",
                            },
                            envelope: {
                                attack: 0.005,
                                decay: 0.1,
                                sustain: 0.9,
                                release: 1,
                            },
                            filter: {
                              Q: 6,
                              type: lowpass,
                              rolloff: -24,
                            },
                            filterEnvelope: {
                              attack: 0.06,
                              decay: 0.2,
                              sustain: 0.5,
                              release: 2,
                              baseFrequency: 200,
                              octaves: 7,
                              exponent: 2,
                            },
                          });
FM Synth
                        const fmSynth = new Tone.FMSynth({
                            envelope: {
                                attack: 0.1,
                                decay: 0.5,
                                release: 4,
                              },
                              modulationEnvelope: {
                                attack: 0.3,
                                decay: 0.5,
                                release: 1,
                              }
                            harmonicity: 8,
                            modulationIndex: 10,
                          });
DuoSynth
                        const duoSynth = new Tone.DuoSynth({
                            voice0: {
                              oscillator: {
                                type: "sine",
                              },
                              filter: {
                                Q: 6,
                                type: "lowpass",
                                rolloff: -24,
                              },
                              envelope: {
                                attack: 0.005,
                                decay: 0.1,
                                sustain: 0.7,
                                release: 1,
                              },
                              filterEnvelope: {
                                attack: 0.06,
                                decay: 0.2,
                                sustain: 0.5,
                                release: 2,
                                baseFrequency: 1000,
                                octaves: 3,
                                exponent: 2,
                              },
                            },
                            voice1: {
                              oscillator: {
                                type: "sine",
                              },
                              filter: {
                                Q: 6,
                                type: "lowpass",
                                rolloff: -24,
                              },
                              envelope: {
                                attack: 0.005,
                                decay: 0.1,
                                sustain: 0.7,
                                release: 1,
                              },
                              filterEnvelope: {
                                attack: 0.06,
                                decay: 0.2,
                                sustain: 0.5,
                                release: 2,
                                baseFrequency: 1000,
                                octaves: 3,
                                exponent: 2,
                              },
                            },
                            vibratoAmount: 0.5,
                            vibratoRate: 5,
                            harmonicity: 1.5,
                          });
Pluck Synth
                        const pluckSynth = new Tone.PluckSynth({
                                attackNoise : 1 ,
                                dampening : 4000 ,
                                resonance : 0.7
                          });
The synths.js file creates four different Tone.Synth objects
Re-assign the mySynth variable on line 3 to different synth objects defined in synths.js
Coding Challenge
How can we trigger the synth using our computer keyboard?
Hint: check out the p5js documentation for key and keyPressed()
This is one of many possible approaches
What is a sampler?

a sampler allows music to be made out of any sound recorded by the user, rather than relying on tones generated by oscillators
Samples are any audio files used as the sound source in a sampler

Let's change our Tone.Synth to a Tone.Sampler
                        const sampler = new Tone.Sampler({
                            urls: {
                                  A1: "A1.mp3",
                                  A2: "A2.mp3",
                              },
                              baseUrl: "https://tonejs.github.io/audio/casio/",
                              attack: 0,
                              release: 1
                          }).toDestination();
Notice that we only define audio files for two notes
Tone.Sampler automatically repitches the samples, making it is possible to play pitches which were not explicitly included
Try changing "casio" in the baseUrl path to "salamander"
These audio files are hosted at https://github.com/Tonejs/audio
Samples can also be loaded from local files
In this example, audio files are uploaded to a /samples sub-directory
Loading local files can take time; include an onload message to indicate when the files have finished loading
Samples can also be unpitched percussion
In this example, we don't want to repitch our samples so we provide the exact path to each file and only use those exact note values in our sequence
The note values no longer correspond to pitch, but rather as a "key" to each unique sample
Samples can be anything!
(any audio file that is)
Let's add some effects!

Tone.js has many built-in effect objects, including delay, reverb, chorus, & distortion
                    const sampler = new Tone.Sampler({
                        urls: {
                              A1: "A1.mp3",
                              A2: "A2.mp3",
                          },
                          baseUrl: "https://tonejs.github.io/audio/casio/"
                      })

                      const delay = new Tone.PingPongDelay({
                        delayTime: "16n",
                        feedback: 0.5,
                        wet: 0.5
                      })

                      sampler.chain(delay);

                      delay.toDestination();
Try changing the wet value from a float between 0 and 1
Wet and Dry refer to how much of the source signal is passed through the effect vs how much is passed through unaffected
Now try changing the delay time to other time signature relative values (e.g. "4n", "8n.", or "1m")
Finally change the feedback value to a float between 0 and 1. Be careful with higher values!
For more info about time values in Tone.js, see https://github.com/Tonejs/Tone.js/wiki/Time
The reverb effect can provide a sense of sound in a physical space
Everyone loves distortion!
Coding Challenge
Try applying one of the other effects listed at https://tonejs.github.io/docs/14.7.77/index.html
We can chain multiple effects together
                        const sampler = new Tone.Sampler({
                            urls: {
                                  A1: "A1.mp3",
                                  A2: "A2.mp3",
                              },
                              baseUrl: "https://tonejs.github.io/audio/casio/"
                          })

                          const delay = new Tone.PingPongDelay({
                            delayTime: "16n",
                            feedback: 0.5,
                            wet: 0.5
                          })

                          const reverb = new Tone.Reverb({
                            decay: 3,
                            preDelay: 0.1,
                            wet: 0.7
                          })

                          const distortion = new Tone.Distortion({
                            distortion: 5,
                            wet: 1
                          })

                          sampler.chain(distortion, delay, reverb);

                          reverb.toDestination();
Try reversing the order of the effects chain to see how it affects the sound
Remember that the final effect in the chain should be connected to the toDestination() method
Web Audio: Day Two
Sequencing & UI
Learning Objectives
- Sequence musical events
- Build simple GUIs to control sequences and parameters
Make a copy of this p5js sketch as your starting point for today
Time in Tone.js
https://github.com/Tonejs/Tone.js/wiki/TimeChange the sustain length (second argument to triggerAttackRelease on line 21 of sketch.js) to time signature relative values (e.g. "4n", "16n", etc)
Tone.Loop
                        const myLoop = new Tone.Loop((time) => {
                            monoSynth.triggerAttackRelease("C4", "16n", time);
                          }, "4n").start(0);

                          Tone.Transport.start();
BPM
We can change the tempo with Tone.Transport.bpm
Tone.Transport.bpm.value = 80;
Notice that everything in our callback function on lines 6-8 repeats at the rate defined on line 9
Try changing the bpm value on line 3
Learn more about callback functions
Playing a Melody
Given the following array of note values, how can we program our loop to play a different note each time?
const notes = ["C3", "D3", "G3", "A3", "C4", "E4"];
Option One
                        const notes = ["C3", "D3", "G3", "A3", "C4", "E4"];
                        let index = 0;

                        const myLoop = new Tone.Loop((time) => {
                            let note = notes[index];
                            monoSynth.triggerAttackRelease(note, "16n", time);
                            index++;
                            if (index > notes.length - 1) {
                                index = 0;
                            }
                        }, "4n").start(0);
Option Two
                        const notes = ["C3", "D3", "G3", "A3", "C4", "E4"];
                        let index = 0;

                        const myLoop = new Tone.Loop((time) => {
                            let note = notes[index%notes.length];
                            monoSynth.triggerAttackRelease(note, "16n", time);
                            index++;
                        }, "4n").start(0);
Because we used notes.length in our conditional statement on line 13, we can add or remove values from the notes array without any issues
Rests
How might we add rests (pauses) to our sequence?
                        const notes = ["C3", "D3", "rest", "G3", "A3", "rest", "C4", "E4"];
                        let index = 0;

                        const myLoop = new Tone.Loop((time) => {
                            let note = notes[index];
                            if (note !== "rest"){
                                monoSynth.triggerAttackRelease(note, "16n", time);
                            }
                            index++;
                            if (index > notes.length - 1) {
                                index = 0;
                            }
                        }, "4n").start(0);
Tone.Pattern
                        const pattern = new Tone.Pattern((time, note) => {
                            monoSynth.triggerAttackRelease(note, "16n", time);
                        },["C2", "D4", "E5", "A6"],"upDown").start(0);

                        pattern.interval = "16n";
Try changing the pattern type
Options include "up", "down", "upDown", "random"
For a full list of pattern names, see https://tonejs.github.io/docs/14.7.39/type/PatternName
Tone.Sequence
                        const seq = new Tone.Sequence((time, note) => {
                            monoSynth.triggerAttackRelease(note, "16n", time);
                        }, ["C4", ["E4", "D4"], "G4", ["A4", "G4"]], "4n").start(0);
Subarrays indicate subdivisions of the interval
Try changing the order and number of notes in subarrays on line 9
What happens with multiple layers of nesting arrays?
Playing multiple sequences simultaneously
We can't trigger the same synth twice at the same time
                        const seq1 = new Tone.Sequence((time, note) => {
                            monoSynth.triggerAttackRelease(note, "16n", time);
                        }, ["C4", ["E4", "D4", "E4"], "G4", ["A4", "G4"]], "2n").start(0);

                        const seq2 = new Tone.Sequence((time, note) => {
                            monoSynth.triggerAttackRelease(note, "16n", time);
                        }, ["G3", "G4", "E4", "D3", ["A4", "G4"]], "8n").start(0);

                        Error: Start time must be strictly greater than previous start time
One option is to create two separate synths and trigger each with a different sequence
In this example, two synths are defined in synths.js and each sequence triggers a different one
Another option is to pass our synth as an argument to Tone.PolySynth()
                        const polySynth = new Tone.PolySynth(Tone.Synth, {
                            oscillator: {
                              type: "sawtooth"
                            },
                            envelope: {
                              attack: 0.01,
                              decay: 0.3,
                              sustain: 0.7,
                              release: 2
                            }
                          }).toDestination();
with Tone.PolySynth() our synth becomes "polyphonic", meaning it can play multiple notes at once
for more on polyphony, check out https://www.perfectcircuit.com/signal/synthesizer-polyphonyControlling params with UI
Let's use p5.js to control synth parameters in real time
Using p5's mouseX and mouseY variables
                        function draw(){
                            delay.wet.value = map(mouseX, 0, width, 0, 1, true);
                            delay.feedback.value = map(mouseY, height, 0, 0, 0.9, true);
                        }
We need to scale the mouseX and mouse Y values to the appropriate range using P5's map() method (lines 25-26)
In this example, mouseX and mouseY have a possible range of 0-400 (canvas width and height), while delay.wet and delay.feedback are 0-1
read more about p5 map: https://p5js.org/reference/#/p5/map
Using key presses
                        const myDistort = new Tone.Distortion({
                            distortion: 0,
                            wet: 1
                          });

                        let distortionVal = 0;

                        function draw(){
                            if (keyIsDown(UP_ARROW)) {
                                distortionVal += 0.05;
                              }
                            if (keyIsDown(DOWN_ARROW)) {
                                distortionVal -= 0.05;
                              }
                            myDistort.distortion = distortionVal;
                        }
The nested if-statement on line 29 ensures that the distortion value doesn't go below zero (which would throw an error)
Using sliders
                    let slider;

                    function setup(){
                        slider = createSlider(0, 1, 0, 0.01);
                        slider.position(100, 150);
                        slider.style('width', '150px');
                    }

                    function draw(){
                        reverb.wet.value = reverbSlider.value();
                    }
Parameters to createSlider on line 17 are (minimum value, maximum value, initial value, increment amount)
Project Code Along
Create a programmable drum machine

Parameters
- Should include 6 rows of 12 checkboxes
- Each column represents a step in the sequence and each row represents a different "instrument"
- The sampler is triggered when a checkbox in the current step is checked
- Should include 3 sliders to allow user to change FX parameters
- A fourth slider should allow the user to change the tempo
Create a row of checkboxes
                        let startButton;
                        let stopButton;
                        const notes = ["A1", "B1", "C1", "D1", "E1", "F1"];
                        let index = 0;
                        let row = [];

                        function setup() {
                          createCanvas(400, 400);
                          startButton = createButton("start transport");
                          stopButton = createButton("stop transport");
                          startButton.mousePressed(startTransport);
                          stopButton.mousePressed(stopTransport);

                          // Create checkboxes and push to row array
                          for (let i = 0; i < 12; i++) {
                            let cb = createCheckbox();
                            cb.position(i * 20 + 25, 20);
                            row.push(cb);
                          }
                        }
Create a Tone.Loop to cycle through checkboxes and check if "checked"
                        let index = 0;

                        const loop = new Tone.Loop((time) => {
                            let currentStep = row[index];
                            if (currentStep.checked()) {
                              sampler.triggerAttackRelease(notes[0], "8n", time);
                            }
                            index++;
                            if (index > row.length-1){
                                index = 0;
                            }
                        }, "8n").start(0);
Start the transport and click the checkboxes to trigger the sampler
Visually highlight the current step
                        let step = 0;

                        const loop = new Tone.Loop((time) => {
                            for (let i = 0; i < row.length; i++) {
                                row[i].style("background-color", "gray");
                            }
                            let currentStep = row[index];
                            currentStep.style("background-color", "coral")
                            if (currentStep.checked()) {
                              sampler.triggerAttackRelease(notes[0], "8n", time);
                            }
                            index++;
                            if (index > row.length-1){
                                index = 0;
                            }
                        }, "8n").start(0);
Start the transport and click the checkboxes to trigger the sampler
Create six rows of checkboxes
                        let startButton;
                        let stopButton;
                        const notes = ["A1", "B1", "C1", "D1", "E1", "F1"];
                        let index = 0;
                        const rowLength = 12;
                        const numRows = 6;
                        const grid = [];

                        function setup() {
                            createCanvas(300, 400);
                            startButton = createButton("start transport");
                            stopButton = createButton("stop transport");
                            startButton.mousePressed(startTransport);
                            stopButton.mousePressed(stopTransport);

                            for (let j = 0; j < numRows; j++) {
                                let row = [];
                                for (let i = 0; i < rowLength; i++) {
                                    let cb = createCheckbox();
                                    cb.position(i * 20 + 25, j* 20 + 25);
                                    row.push(cb);
                                }
                                grid.push(row);
                            }
                        }
Check if the boxes for the current step are checked in each row
                        const loop = new Tone.Loop((time) => {
                            for (let i = 0; i < numRows; i++) {
                              let currentRow = grid[i];
                              let currentStep = currentRow[index];
                              let note = notes[grid.indexOf(currentRow)];
                              if (currentStep.checked()) {
                                sampler.triggerAttackRelease(note, "8n", time);
                              }
                            }
                            index++;
                            if (index > rowLength-1) {
                              index = 0;
                            }
                        }, "8n").start(0);
and set the note for each row based on its index in the grid array
Start the transport and click the checkboxes to trigger the sampler
Highlight current steps
                        const loop = new Tone.Loop((time) => {
                            for (let i = 0; i < numRows; i++) {
                              let currentRow = grid[i];
                              for (let j = 0; j < rowLength; j++) {
                                currentRow[j].style("background-color", "gray");
                              }
                              let currentStep = currentRow[index];
                              currentStep.style("background-color", "coral");
                              let note = notes[grid.indexOf(currentRow)];
                              if (currentStep.checked()) {
                                sampler.triggerAttackRelease(note, "8n", time);
                              }
                            }
                            index++;
                            if (index > rowLength-1) {
                              index = 0;
                            }
                        }, "8n").start(0);
Start the transport and click the checkboxes to trigger the sampler
Create four sliders
                        let startButton;
                        let stopButton;
                        const notes = ["A1", "B1", "C1", "D1", "E1", "F1"];
                        let index = 0;
                        const rowLength = 12;
                        const numRows = 6;
                        const grid = [];
                        const sliders = [];

                        function setup() {
                        createCanvas(300, 400);
                        startButton = createButton("start transport");
                        stopButton = createButton("stop transport");
                        startButton.mousePressed(startTransport);
                        stopButton.mousePressed(stopTransport);

                        // For loop to create 7 rows of checkboxes
                        for (let j = 0; j < numRows; j++) {
                            let row = [];
                            for (let i = 0; i < rowLength; i++) {
                                let cb = createCheckbox();
                                cb.position(i * 20 + 25, j * 20 + 25);
                                cb.style("background-color", "gray");
                                row.push(cb);
                            }
                            grid.push(row);
                        }

                        for (let i = 0; i < 4; i++) {
                            let s = createSlider(0, 1, 0, 0.01);
                            s.position(25, i*30+150);
                            s.style("width", "230px");
                            sliders.push(s);
                        }
                    }
Control FX params with sliders
                        function draw() {
                            background(220);
                            reverb.wet.value = sliders[0].value();
                            crusher.wet.value = sliders[1].value();
                            delay.wet.value = sliders[2].value();
                          }
In this example, the fourth slider is used to control bpm (line 42). Notice that we map the slider value (0-1) to a range appropriate for bpm (60-140)
Notice also that we wrap all of the slider value changes in an if (mouseIsPressed) conditional statement to save unecessarily running code when the values haven't changed
Taking it further
- Add a button that clears all checkboxes
- Create a "randomize" button that randomly checks some boxes in the grid
- Create a "reverse" button that plays the sequence backwards
- Add more sliders for further control of FX parameters
- Change the sampler to a synth and map sliders to synth params
- Add additional styling
Web Audio: Day Three
Visualizing Audio
Learning Objectives
- Stream audio files with Tone.Player
- Visualize audio using amplitude and frequency data
- Connect musical events to p5js animations
Streaming Audio
Tone.Player
                        const player = new Tone.Player({
                            loop: true,
                            url:  "loop4.mp3",
                            onload: () => {
                              console.log('loaded')
                            }
                          }).toDestination();
Visualizing Audio
Visualize Amplitude
                        const waveform = new Tone.Waveform();
                        player.connect(waveform);

                        function draw(){
                            const values = waveform.getValue();

                            for (let i = 0; i < values.length; i++) {
                                const amplitude = values[i];
                                let w = amplitude * 800;
                                rect(width/2, height/2, w);
                            }
                        }
visualizing amplitude
Visualize Frequency
                        let levels = fft.getValue();
                        for (let i = 1; i< levels.length;i++){
                            let binMapped = map(levels[i], -100, 0, height, 0);
                            stroke(binMapped, binMapped/2, 100);
                            let thisBin = line(i * 25, height, i * 25, binMapped);
                        }
visualizing frequency
Visualize Pitch
                        let circleX = 200;
                        const seq = new Tone.Sequence((time, note) => {
                            synth.triggerAttackRelease(note, "16n ", time, random(1));
                            let hertz = Tone.Frequency(note).toFrequency();
                            circleX = map(hertz, 0, 1000, 0, width);
                        }, ["C4 ", ["E4 ", "D4 ", "C3 ", "G5 "], "G4 ", ["A4 ", "G4 "]], "2n ").start(0);

                        function draw() {
                            background(0);
                            fill(255);
                            ellipse(circleX, 100, 20);
                        }
Tone.Frequency() can be used to convert notes (e.g. "C4 ") to frequency values
For a note::frequency conversion chart, see https://pages.mtu.edu/~suits/notefreqs.html
visualizing pitch
In this final example, each circle's x position is determined by the current position of each loop as defined by the "step " variable
Each loop references the same notes array, but with different intervals and delay times (e.g. line 30)
Only the first loop plays through the entire notes array. Notice, for example, how line 23 uses notes.length-5 as the divisor
Animation -> Sound
Putting it all together
Independent work
Create an audio/visual sketch using Tone.js and p5.js